Voici la question qui me guide dans mes recherches...

L’appât du gain manifesté par les entreprises supranationales et certains groupes oligarchiques, de même que le contrôle des ressources naturelles par ceux-ci, dirigent l’humanité vers un nouvel ordre mondial de type féodal, voir même sa perte. Confronté à cette situation, l’être humain est invité à refuser d’accepter d’emblée une pseudo-vérité véhiculée par des médias peut-être à la solde de ces entreprises et groupes. Au contraire, il est invité à s’engager dans un processus de discernement et conscientisation afin de créer sa propre vérité par la confrontation de sa réalité nécessairement subjective à des données objectives, telles que révélées par la science, par exemple.

The penalty that good men pay for not being interested in politics is to be governed by men worse than themselves. - Plato

mardi 23 février 2016

IoT: Installing a MQTT broker

Introduction to MQTT

For my IoT devices, I will be using MQTT to communicate sensor data to clients.

Here's a quick diagram showing how this works.

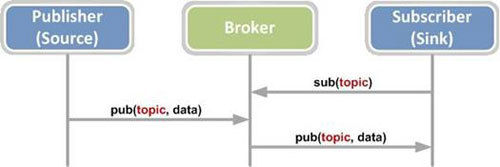
  • Publisher can be a xBee + temperature sensor, a nodeMCU + humidity sensor, sending topic and data.
  • The broker is the server part receiving the publication from the publishers (sensors) and serving the subscribers, reading the data.
  • Subscribers are the clients subscribing to the topics and getting the data for display, analysis etc.

Installing a broker

In this quick post, I am using the MQTT broker called mosquitto on fedora server 23 x64bit.  Here are the steps to install and test it.

Install
  • dnf install mosquitto.x86_64
Testing
  • ssh1: start mosquitto
    • mosquitto
      1456270790: mosquitto version 1.4.5 (build date 2015-11-27 15:20:56+0000) starting
      1456270790: Using default config.
      1456270790: Opening ipv4 listen socket on port 1883.
      1456270790: Opening ipv6 listen socket on port 1883.
      1456270827: New connection from ::1 on port 1883.
      1456270827: New client connected from ::1 as mosqsub/26144-localhost (c1, k60).
      1456270870: New connection from ::1 on port 1883.
      1456270870: New client connected from ::1 as mosqpub/26149-localhost (c1, k60).
      1456270870: Client mosqpub/26149-localhost disconnected.
  • ssh2: Starts a subscription to the topic "hello/world".
    • mosquitto_sub -d -t hello/world
      Client mosqsub/26499-localhost sending CONNECT
      Client mosqsub/26499-localhost received CONNACK
      Client mosqsub/26499-localhost sending SUBSCRIBE (Mid: 1, Topic: hello/world, QoS: 0)
      Client mosqsub/26499-localhost received SUBACK
      Subscribed (mid: 1): 0
  • ssh3: Publish a first message on the topic "hello/world"
    • mosquitto_pub -d -t hello/world -m "This is my first message"
      Client mosqpub/26511-localhost sending CONNECT
      Client mosqpub/26511-localhost received CONNACK
      Client mosqpub/26511-localhost sending PUBLISH (d0, q0, r0, m1, 'hello/world', ... (24 bytes))
      Client mosqpub/26511-localhost sending DISCONNECT
In the window that started the broker (mosquitto), (ssh1),  you should see:
1456274285: New connection from ::1 on port 1883.
1456274285: New client connected from ::1 as mosqpub/26549-localhost (c1, k60).
1456274285: Client mosqpub/26549-localhost disconnected.

In the window that started the subscription (ssh2), you should see this:
Client mosqsub/26499-localhost received PUBLISH (d0, q0, r0, m0, 'hello/world', ... (24 bytes))
This is my first message
 and from time to time those ping request:
Client mosqsub/26499-localhost sending PINGREQ
Client mosqsub/26499-localhost received PINGRESP
For the above, I used this video for reference.

Windows MQTT client:


Now let's try a MQTT client on Windows.  I found this Chrome extension:
You may need to open the firewall on the server side to open port 1883:
firewall-cmd --add-port=1883/tcp
Then from the MQTTlens, you can now create a new connection like this:

After a save, you should get a connection.
Then you can try the subscribe and publish


We see here that the publish we pushed from the windows client, appeared in the subscription windows of the server. Then we sent from the server "this is my first message" and saw in the on both the server subscription and the client.

 Next step... getting my IoT device talking to the broker.  Hardware ordered!

dimanche 31 janvier 2016

Getting started with Internet of Things IoT

Update: Feb 21th 2016:


So I decided to start my exploration with 2 modules.

First one is the NodeMCU (manufacturer)
  • Contains a ESP8266 Wi-Fi SoC integrated with a Tensilica Xtensa LX106 core
  • Memory 20kBytes, Storage 4MBytes
  • Running uses the Lua scripting language 
  • Many guide on YouTube
  • Github for the firmware and code
  •  Start here guide on ESP8266.com
I found those on Alibaba from A+A+A+ vendor at a very low cost of around 5$ Can.  Adafruit as a similar product called Feather HUSSAH!

To play with the module, I also purchased the DHT22 Temperature / Humidity combo sensor.
And a DC to DC converted to power it from a 9V battery.

The second module I bought is the Arduino UNO R3 + Proto shield to get familiar with the Aduino line.

I started a blog post at Sparkfun.com to discuss some aspect of the projects.

Will start a new blog post to explain the steps to get those going.


Original post


Here's some quick notes for those of you who are looking to build some IoT devices by your self.

There's two main types of devices to start with, many others, but will cover the 2 main ones first...


1) Arduino based products
  • Arduino comes in a range of form factors some of which are very small (almost as small as a bottle-top in some cases)
  • Can only use one language, a variant of C
  • Need a computer to program it and upload
  • You cannot connect the  usual keyboard, mouse and display.
  • It's good to do simple task, read/write I/O's and take actions
  • Cost varies from 3$ to 20$ and more if adding modules (WiFi)
  • With careful programming, can run a single task for a year on a set of AA batteries
  • Support page of Arduino
  • Home page of the product
  • Lots of digital I/O's, analog input (for sensors) and PWM (for analog out). List per model.
  • Many vendors have enhanced Arduino compatible boards like this one with WiFi, SD card and RTC.
  • Add-on Modules are called "shields".  Many exist, like adding WiFi, controlling motors etc.
  • 5 Great Arduino shields you should buy 
2) Raspberry PI based products
  •  RaspberryPI is a complete PC
  • You can connect a keyboard, mouse and display
  • Cost varies from $20-$60 depending on type of modules
  • RaspPi has a wide variety of programming languages available eg perl, python, php, C, shell etc and can be programming with a keyboard and a HDMI-compatible monitor.
  • Support page of Raspberry Pi
  • Home page of Raspberry Pi
  • WiFi can be added with off-the-shelf USB Wifi stick
  • Consume a lot more power than the Arduino
3) Discovered some more fun things to explore!

Partly discovered from this video

  • Particle Photon
    • Fast 32 bit CPU + I/) and WiFi
  • CHIP - The World's First Nine Dollar Computer
  • PINE A64, First $15 64-Bit Single Board Super Computer
  • UDOO Neo = Raspberry Pi + Arduino + Wi-Fi + BT 4.0 + Sensors
  • LattePanda - A £45 Win10 Computer For Everything
  • Black Swift is a tiny — coin-sized — embedded computer with powerful CPU, integrated Wi-Fi and USB interface

4) Vendors

5) Other info

I will be documenting my project here, which the first one should consist of a Arduino + Wifi monitoring water level, humidity and temperature and exporting the data to ThingSpeak.

dimanche 3 janvier 2016

How to calculate solar power for Canada.

Taking a course on energy on Coursera.  I stumble on this Canadien web site:

http://pv.nrcan.gc.ca/

Where you can find the number of kWh yearly average per kW of solar panel installed.

The FAQ page explains the calculation:

1. What does photovoltaic (PV) potential mean and what do the units kWh/kW refer to?
The PV potential values give a simple estimate of how much AC electricity in kilowatt-hours (kWh) is expected to be generated by a typical grid-connected photovoltaic system without batteries per unit of photovoltaic system rated DC power in kilowatts (kW) at Standard Test Conditions (STC). The STC rated power of a PV system is the total rated DC power at STC of all the photovoltaic modules in the PV system. Standard Test Conditions are: 1000 W/m² irradiance with normal incidence, 25°C module temperature, air mass 1.5. PV potential values are given as totals per month or per year, and represent an estimated average yield over the lifetime of a typical PV system. As an example, if the annual PV potential at a given location is 1150 kWh/kW, this indicates that for a system with a rated STC power of 3 kW, annual electricity production should be approximately 1150 kWh/kW*3 kW=3450 kWh. More about the methodology that was used to estimate PV potential is explained here.

So for my location, the early average if the panels are tilted to my latitude (optimal), I get around 1200kWh/kW.  So if I install this panel of 140W (cost around 300$), I will get:
1200*(140/1000) = 168kWh per year.  Divide this by 365 days and 24h, this give 19.2WattsHr in average over the year for this 140W panel... or 19.2/140*100 = 13.6% capacity factor.

So my 140W panel, gives me a early average of 19.2W.  If I need to power and average house in Canada, which is 12,000kWh/year, this is around 1.4kWh.  So I would need 1400W/19.2W = around 73 panels of 140W or around 22,000$ just for the panels, without counting the batteries and installation. 

I would also need a lot of space!  Around 850 square foot or around 30 foot x 30 foot of south facing space. And I would need to clear the snow of those panels during 3-4 months.

In Quebec, I spend less than 4000$ per year on electricity (I burn wood during winter time).  So to pay for the panels only, it would be 5.5 years of return... With the whole cost, installation, batteries, we can easily double that number to around 10 years.

dimanche 29 novembre 2015

How much nuclear power can we produce with money spend on climate

I was reading the news and saw numbers on how much money spent on climate "research", subsides and other related project.

For the USA only:

Federal anti-climate-change spending is now running at $11 billion a year, plus tax breaks of $20 billion a year.

So I was wondering how much this 31 billion a year could buy in term of clean energy like nuclear.  For sure we need clean energy in developing nation more than in industrialized nations.

Therefore my example, will take China which has become the larger CO2 emitter in the world by a large margins.  According to many report, this will continue until 2030 before leveling off.  India is also growing faster.


CO2 per say is not a big problem, but related emission from those sources can cause pollution problems. 

China is already building a lot of nuclear but is building coal at a fast pace.  Let say we used that 31 billion a year to build more nuclear power....

According to the  world nuclear organization, the "overnight" cost of building 1 kW in Asia is around 2500$. For this quick calculation, I will leave out the other costs which are trivial.

31,000,000,000 / 2,500 = 12,400,000 kW or 12,400 MW every year of clean nuclear power.

That would be enough to displace 3 coal plant of  3,000MW per year.

According to EIA, a coal plant produce 2 pound of CO2 / kWh. So displacing 12,400MW of coal power would save 24,800,000 pound of CO2 per hour or 217,248,000,000 pound per year or 98,542,035 metric ton.  The graph above is expressed in millions (M) of (Thousand metric tons). so 98,542,035 is 98,500 Thousand metric tons.... to get to only 1M, you would need to keep that rate for 10 years. So to get to north American level of emission, you would need 50 years at the rate of replacing 3 coal plant per year with nuclear.

In conclusion, if CO2 was really a major issue, we would not spend that money for nothing but would build nuclear power like crazy.

Remember, those are dollar amount for only the USA climate spending and did a rough calculation just to put some perspective on how much real impact we could have with that amount of money.


mercredi 4 novembre 2015

Help needed - Education

To all my skeptic friends... I need your help.

I am confronted every day with people who only saw one side of the climate debate. Only the alarmist view, nothing more.

The only thing they know about the skeptics is that we don't believe the climate is changing and we are all paid by some evil industry somewhere!
Anyway, you know what I am talking about.


Here's where I need help... I want to build a library of articles and video where we can point someone willing to see the other side of the issue (skeptic view) and be willing to learn.

But I don't want them to start with something that will turn them off, I want to present things as a learning curve where they will learn first what is CO2 and how is temperature measured, for example... I don't want to present them with the conclusion that most of us know that took decades of following debates and reading everything available made possible.

I want to start them soft, show them slowly some facts that the alarmist side are not showing, something that will slowly help them understand the debate and not turn them off to the other point of view while only dismissing us like we are all crazy people!

So... I would like you to comment below this post and propose articles, podcast and video that can help the general public understand this debate, without turning them off.

Thanks for the help!

Simon